The temperature is perfect, the leaves are turning into fiery colors – there’s nothing better than going out for an autumn hike. Karasawa Cirque is, definitely, one of the best autumn hikes in Nagano.
Summary
- 1. What is Karasawa Cirque?
- 2. Basic Info
- 3. Planning Your Hike
- 3.1. Hiking Map
- 3.2. Course Time
- 3.3. Restaurants and Toilets
- 3.4. Mountain Huts and Campsites
- 3.5. Summit your trekking itinerary
- 4. Hiking Route
- 4.1. Kamikochi Bus Terminal
- 4.2. Yokoo Sanso
- 4.3. Hondani Bridge
- 4.4. S Gare (S Scree)
- 4.5. Karasawa Cirque
- 5. Highlights of the Trip
- 6. Getting to Kamikochi
- 6.1. From Matsumoto to Kamikochi
- 6.2. From Tokyo to Kamikochi
- 6.3. From Osaka to Kamikochi
- 6.4. From Nagano to Kamikochi
- 6.5. From Takayama to Kamikochi
What is Karasawa Cirque?
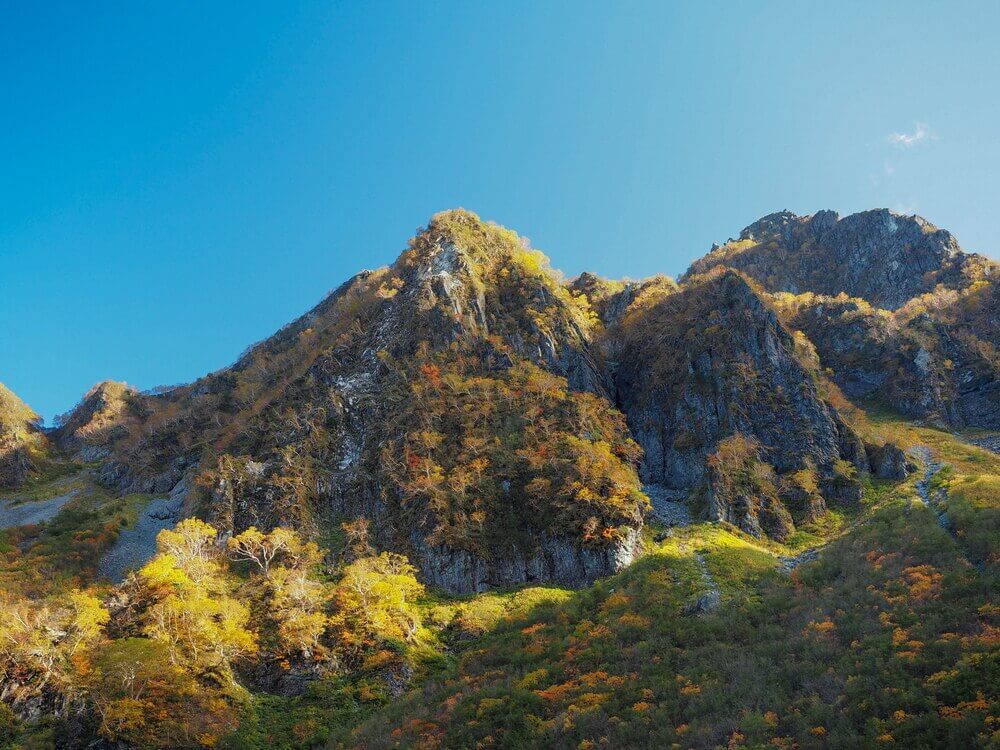
The geography term “cirque” means a crescent-shaped or bowl-shaped valley, with steep sides, formed by glacial erosion. Karasawa Cirque is one of the most gorgeous spots in Kamikochi (or even Japan) for Koyo (autumn leaves) viewing, located at an altitude of 2,300m above sea level. The best time to see autumn leaves around the Karasawa area is usually from late September to early October. It is also an important base for climbing to the peaks of Hotaka Mountain.
Basic Info
Distance: approx. 30 km
Time required approx. 11 hrs. (2 days, 1 night)
Elevation Gain: 800 m
Hiking season: May – October
Itinerary:
Day1: Kamikochi Bus Terminal > Tokusawa > Yokoo Sanso > Karasawa Cirque
Day 2: Karasawa Cirque > Yokoo Sanso > Tokusawa > Kamikochi Bus Terminal
Planning Your Hike
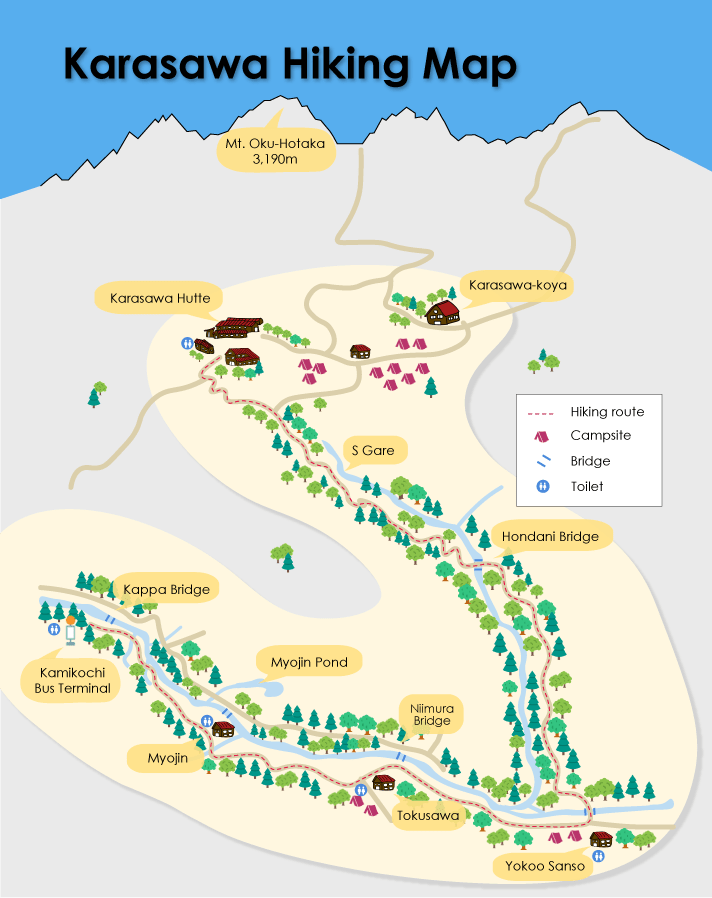
Hiking Map
Mountains are connected, so you can actually hike from anywhere. But in this blog, we will give directions on how to hike from Kamikochi, which is the easiest and most popular route.
Course Time
The total hiking distance is about 30 km long. This time we had a 2 days, 1 night hiking plan, staying overnight at the Karasawa Hutte.

If you are a slow walker or you happen to start your hike late or you are still new to hiking, I recommend you stay at Yokoo Sanso, instead. Your hiking plan might look something like this.
Day 1: Kamikochi Bus Terminal > Yokoo Sanso (overnight)
Day 2: Yokoo Sanso > Karasawa Cirque > Yokoo Sanso (overnight)
Day 3: Yokoo Sanso > Kamikochi Bus Terminal
Whatever hiking plan you make, ensure that you are able to reach the mountain lodge or campsite at around 2-3PM (or the latest at 4PM).
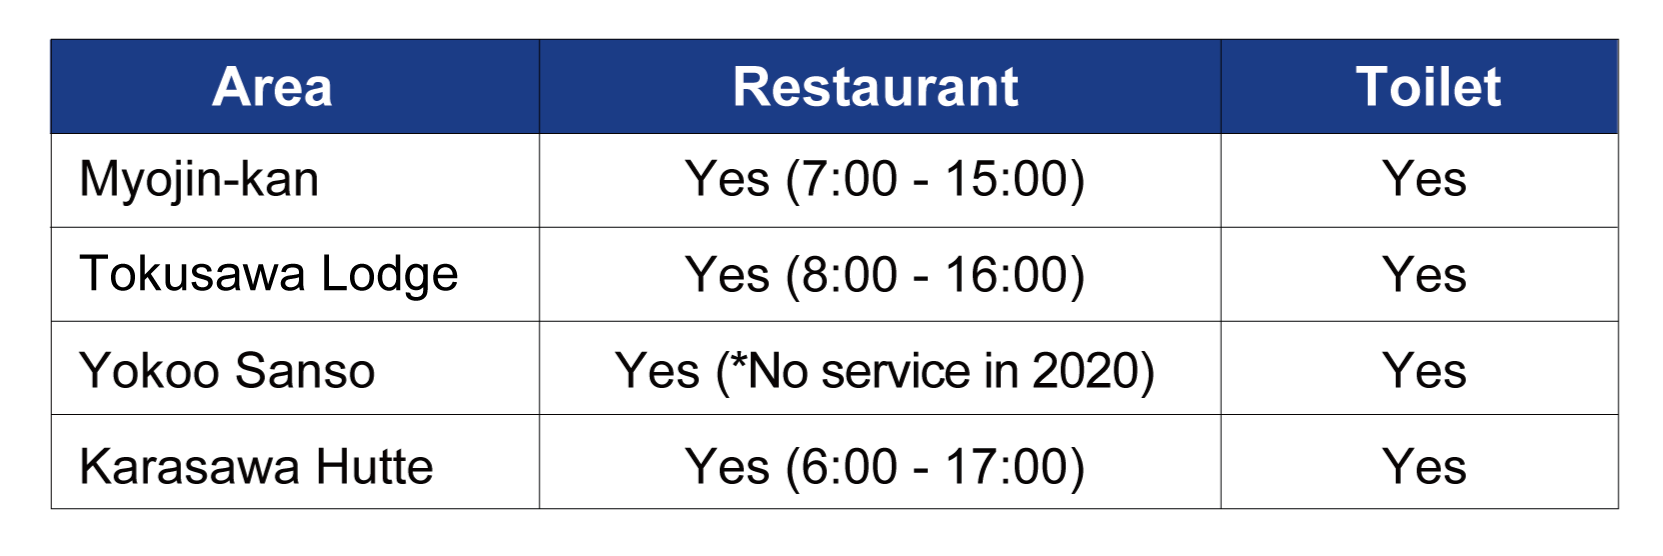
Restaurants and Toilets
As shown on the map, toilets and restaurants are everywhere along the trail. In Kamikochi you pay to use toilets. There is no change, so it is recommended to prepare some 100-yen coins with you. Also, note that they are bio toilets, so don’t expect a typical Japanese high-tech toilet you see elsewhere.
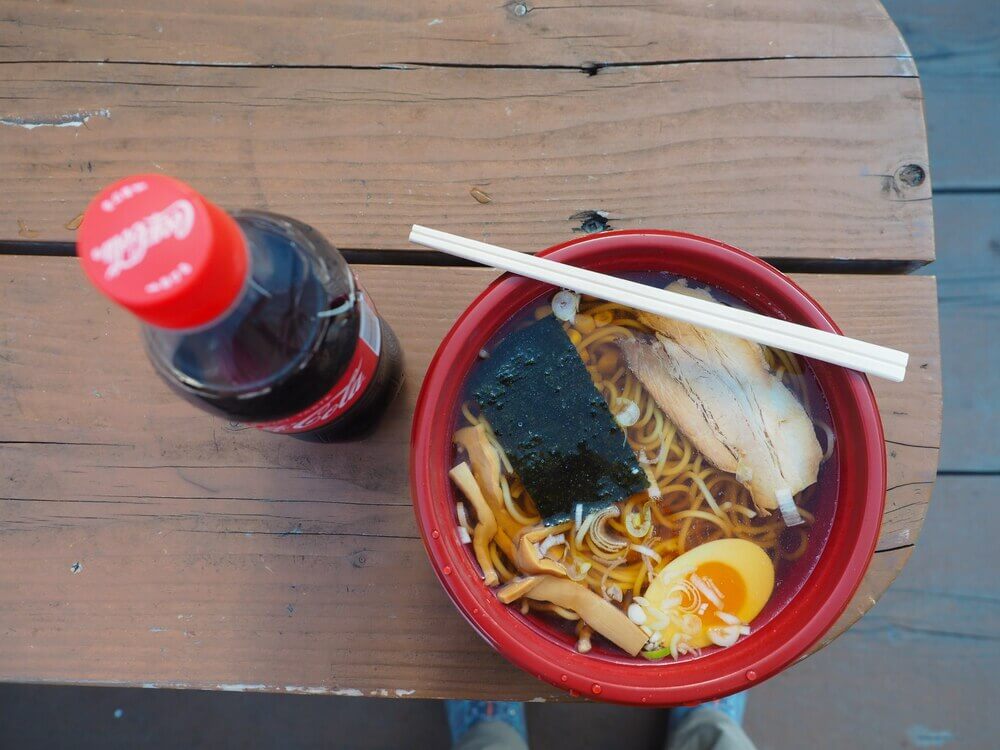
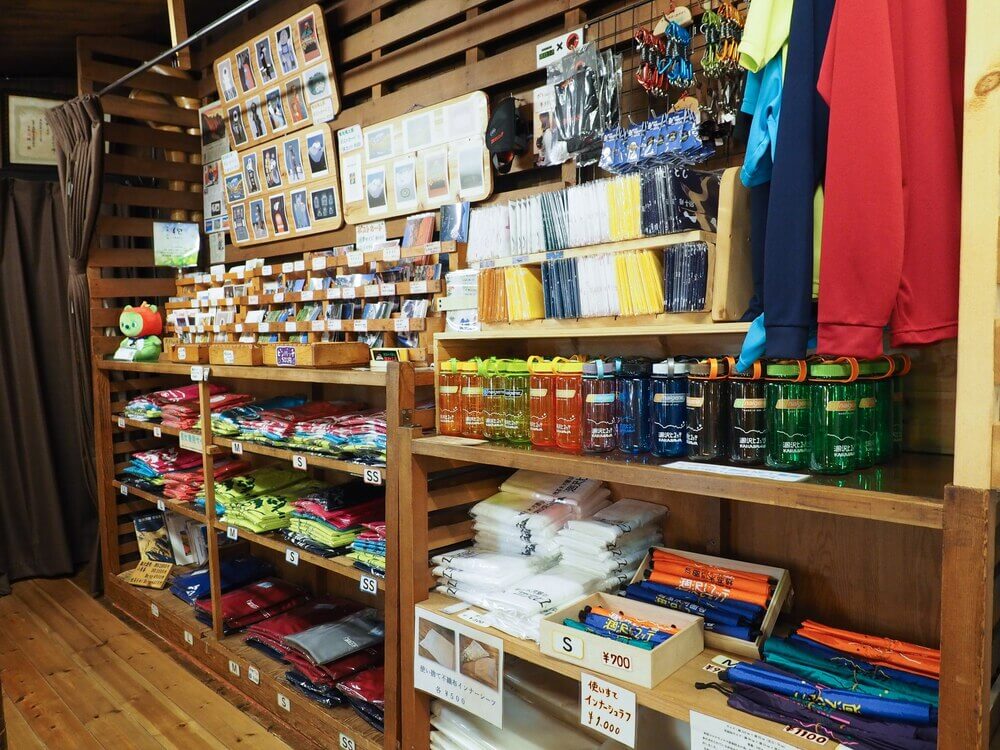
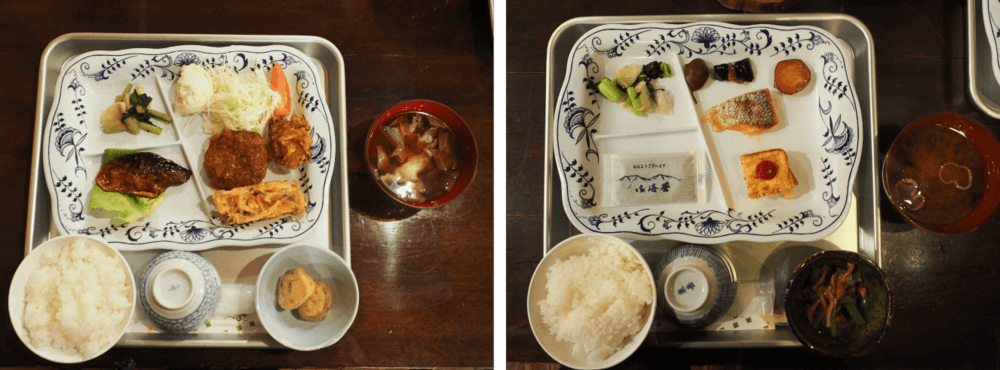
Mountain huts usually offer lunch menus, snacks and drinks for non-staying hikers. The farther you go, the higher the prices, which is understandable, considering the transportation cost. For example, one can of Coca-Cola sold at Karasawa Hutte costs 400 yen, about 3 times the normal price.
Mountain Huts and Campsites
An advance reservation is required. Showing up on the day without a reservation increases the burden of the operation staff. Also, no matter what the reason is, if you have booked and you can’t make it, please inform the lodge. They may contact the rescue team to search for you because assuming you are lost. However, those who stay in a tent don’t need to reserve beforehand.
Note: Most mountain huts don’t accept credit cards, so please bring enough cash.
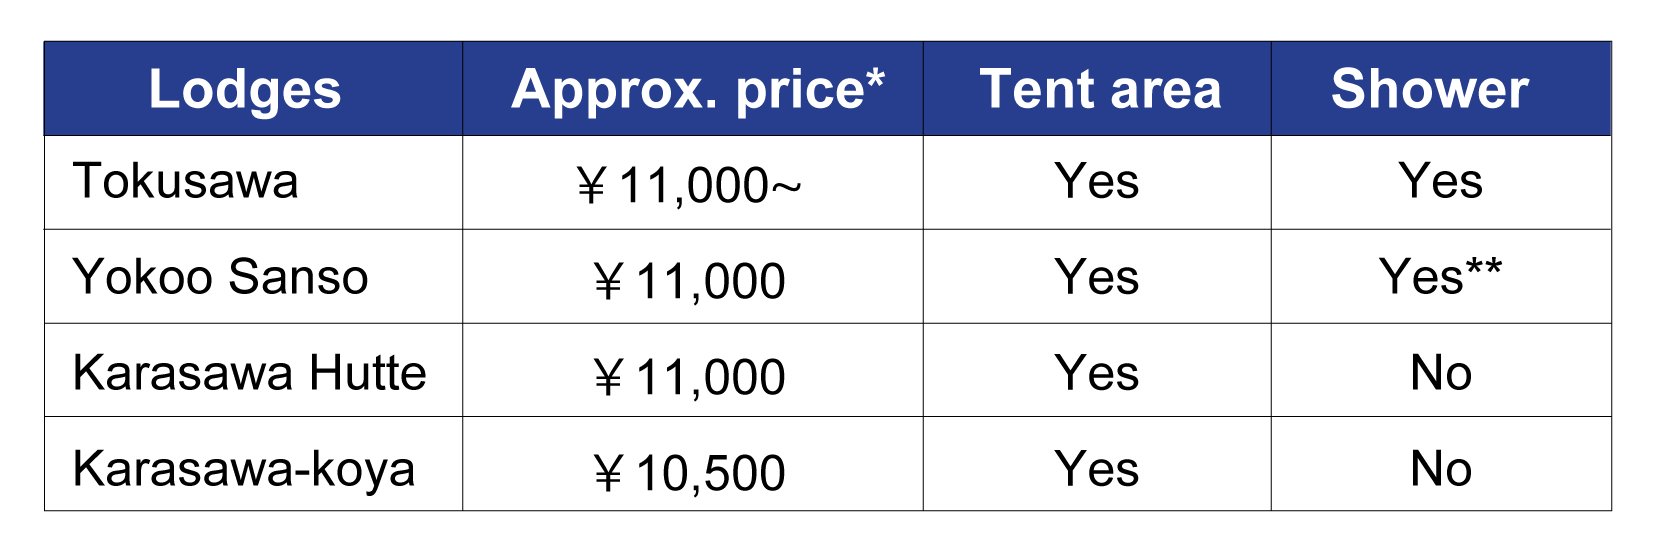
For the latest information, please contact each mountain hut directly.
Tokusawa lodge is the most well-equipped one out of the four. They even provide you with free Wi-Fi and basic amenities like in typical hotels. Yokoo Sanso is also a quite comfortable mountain lodge, especially for newbie hikers, because they have a public bath for you to wash out dirt.
Karasawa Hutte and Karasawa-koya are the most popular ones for those going to Karasawa Cirque, owing to its location and superb views. But in comparison, I would say Karasawa Hutte is probably a little more popular than Karasawa-koya. During the ‘Koyo’ season, it is so crowded that you might have to share one futon (bed) with other two strangers. Reservation is available 1 month prior (by phone only).
Summit your trekking itinerary
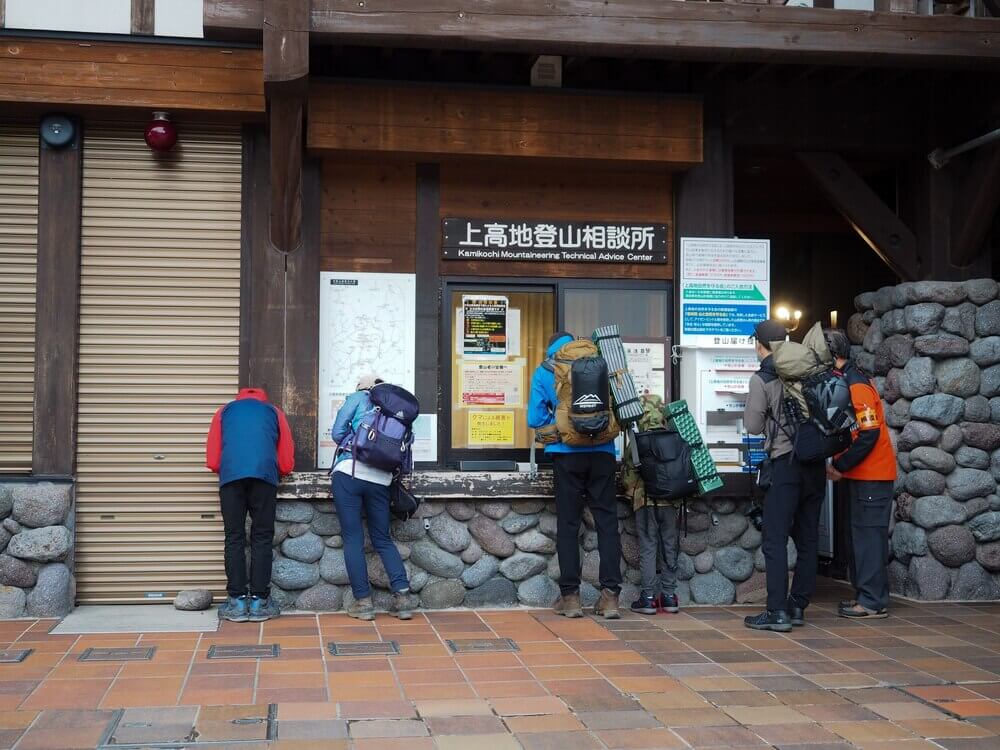
Anyone going further than the flat area of Kamikochi needs to summit a trekking itinerary. The mailbox is located at the entrance of Kamikochi Information Center, next to the toilets. There are forms for filling provided at the post. But our advice is to download the form online and fill it out beforehand for a smoother process.
Hiking Route
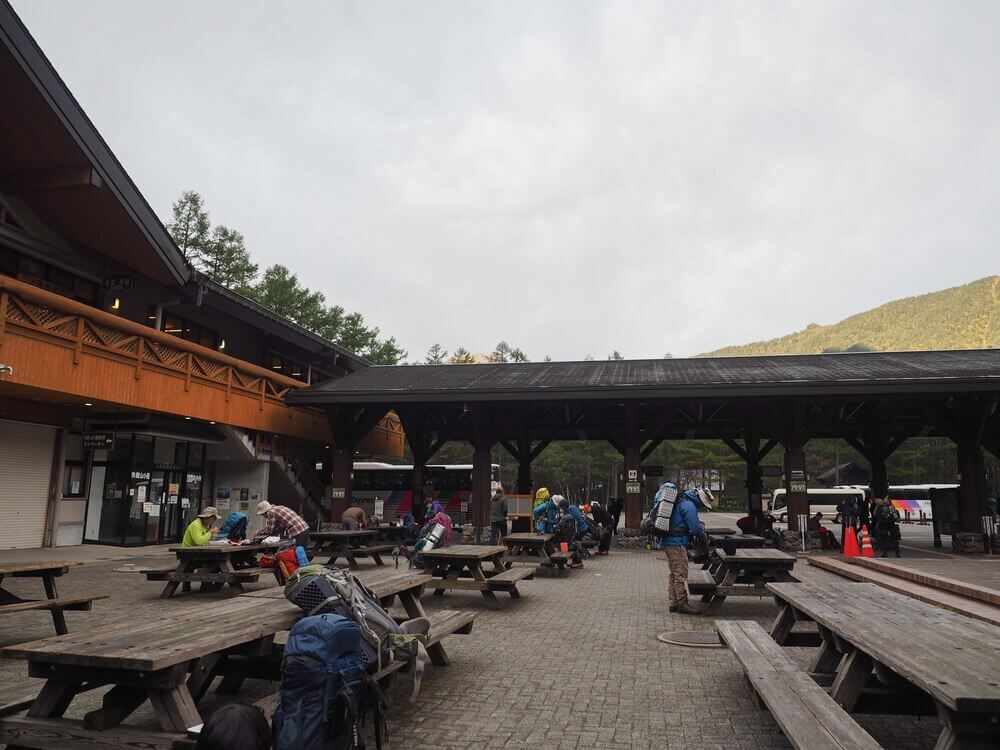
Kamikochi Bus Terminal
Normally, people start hiking at around 06:30 – 08:00. If you start later than that, you’d better speed up or plan to stay at Yokoo Sanso. From the bus terminal to Yokoo Sanso, it is about 10 km long and it takes about 3 hours. This section is mostly a flat area with gentle slopes, making it the perfect warm up before the real hike.
If you don’t want to sleep on a night bus or wake up at 04:45AM to catch a bus to Kamikochi, staying at one of the hotels in Kamikochi the night before is highly recommended.
Read also: Recommended Hotel in Kamikochi (with a Natural Hot Spring!)
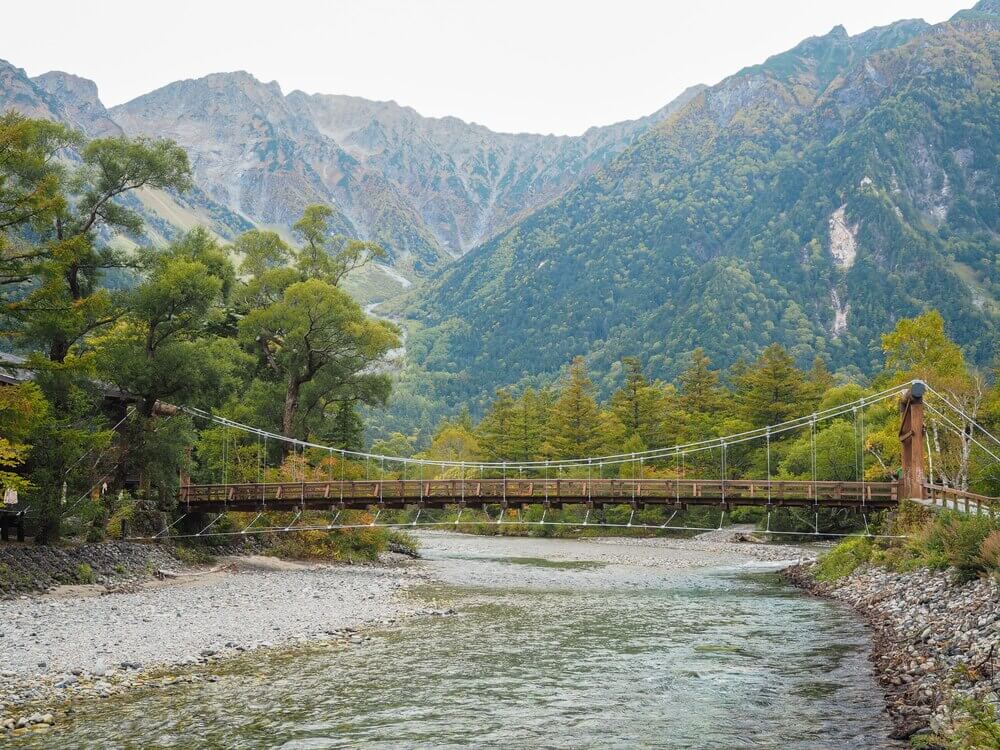
From the bus terminal, you can walk on both sides of the Azusa River but if you choose to walk on the right shore (the opposite side of the bus terminal), you have to cross the Myojin Bridge to get back to the trail.
After about an hour, we see the first landmark on this hiking trail, a lodge and restaurant, Myojin-kan. There’s still a long, long way to go, so we walk past without stopping.

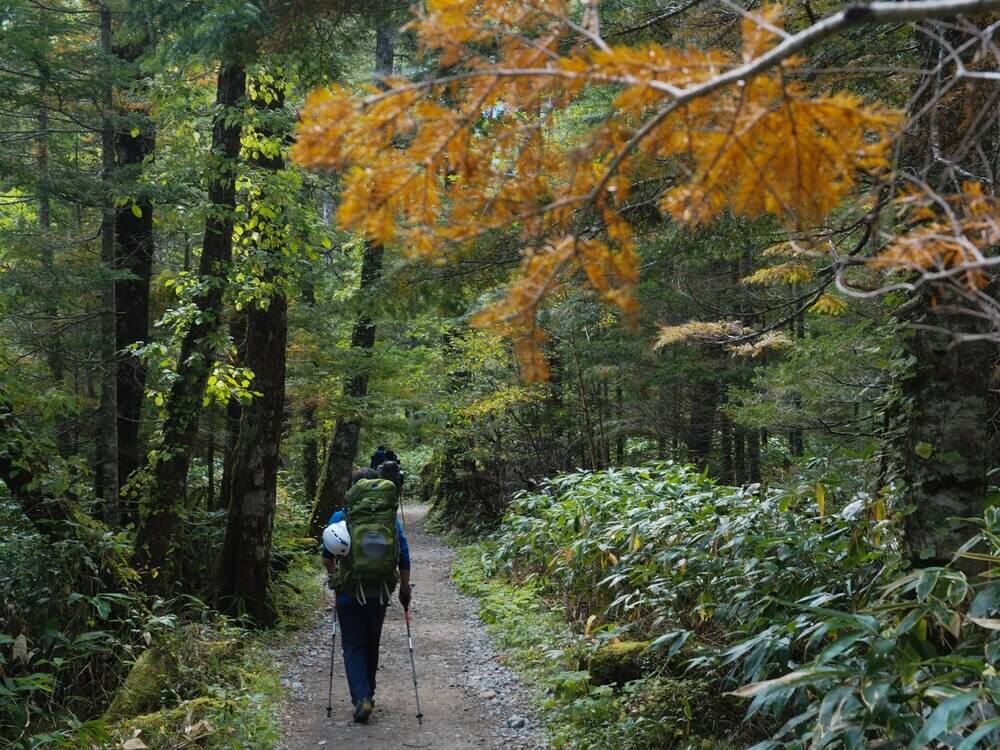
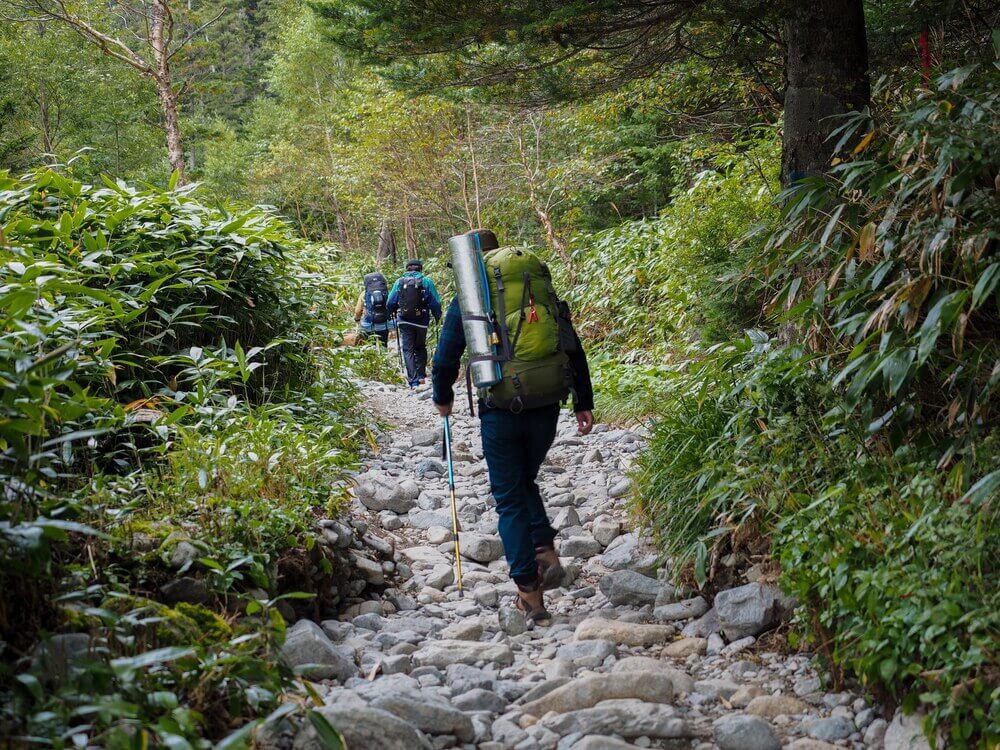
The trail is easy to follow, as we will be walking along the Azusa River more than half of our journey.
The next stop is Tokusawa, which is only about 2 hours from the Kappa Bridge. If you come here around the middle of May until early June, you will see a carpet of little white flowers called “Nirin-so”. It is one of the signs of spring in Kamikochi.
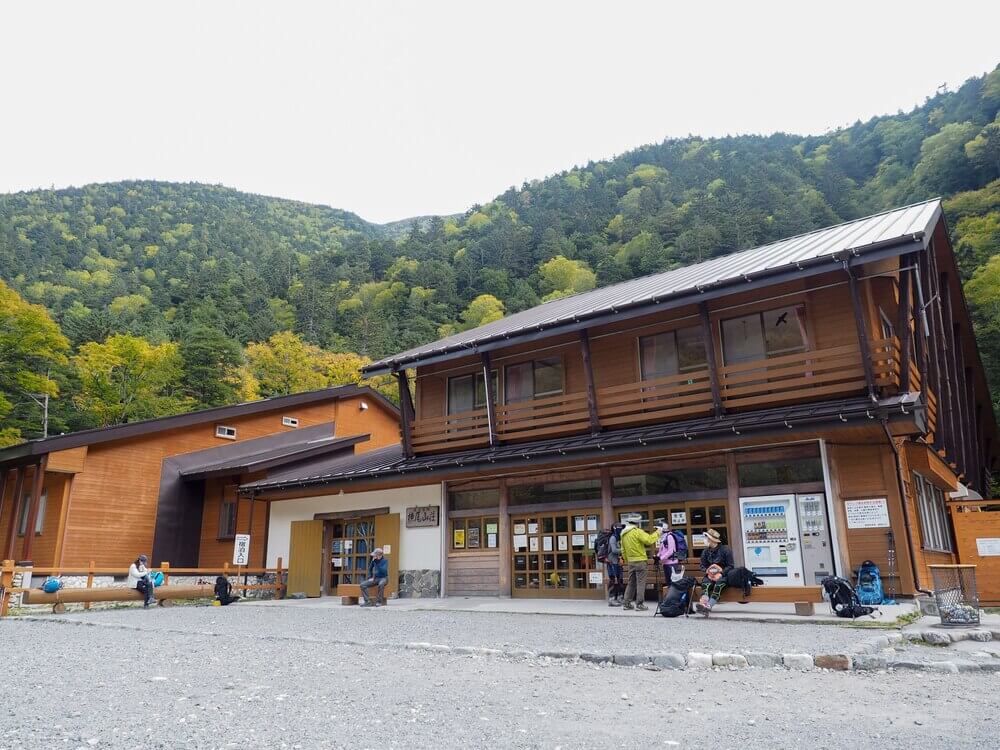
Yokoo Sanso
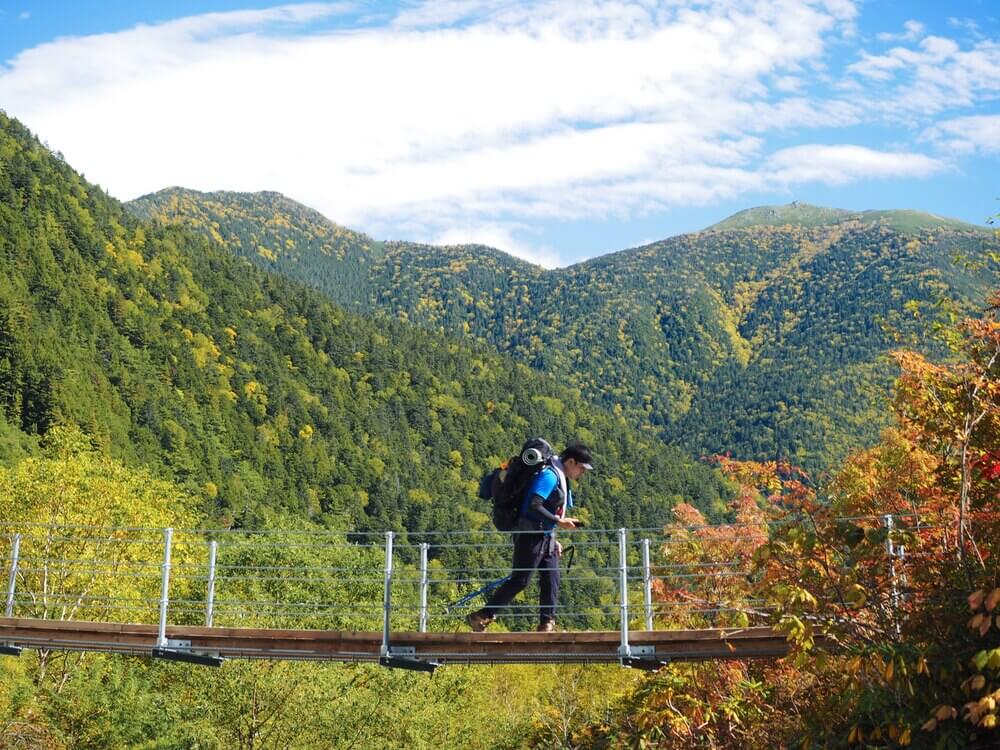
From Tokusawa, it takes about 1 hour to Yokoo Sanso mountain hut. After having a short break at Yokoo Sanso, we cross the Yokoo Ohashi Bridge, and this is where the real hike begins. A rocky trail continues for a few minutes before entering the forest path again.
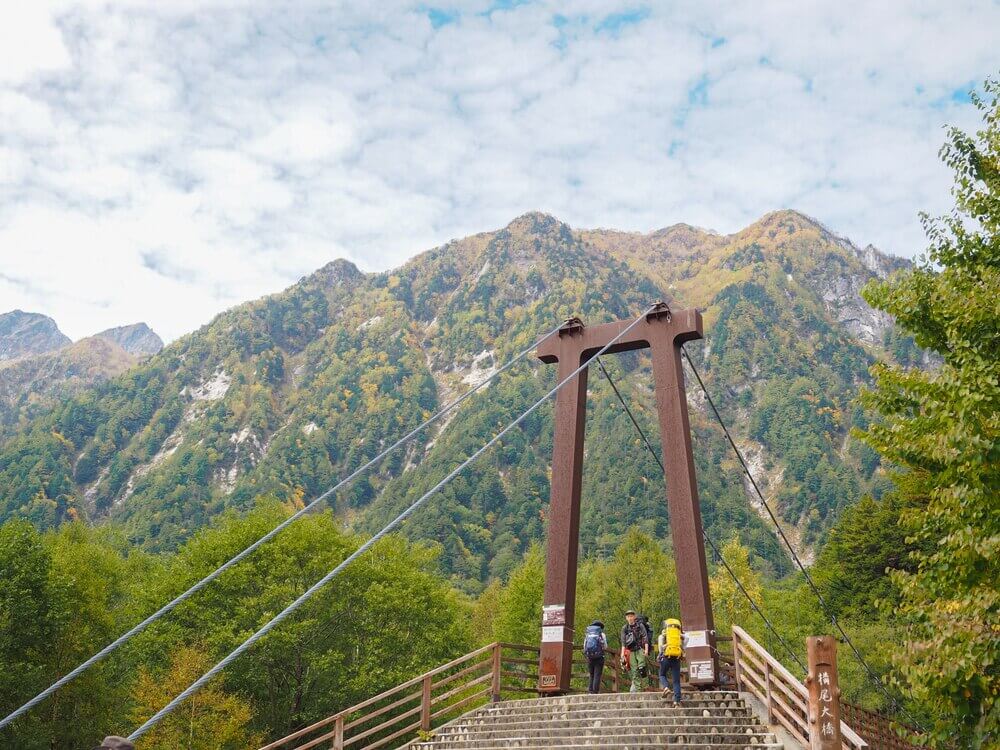
Hondani Bridge
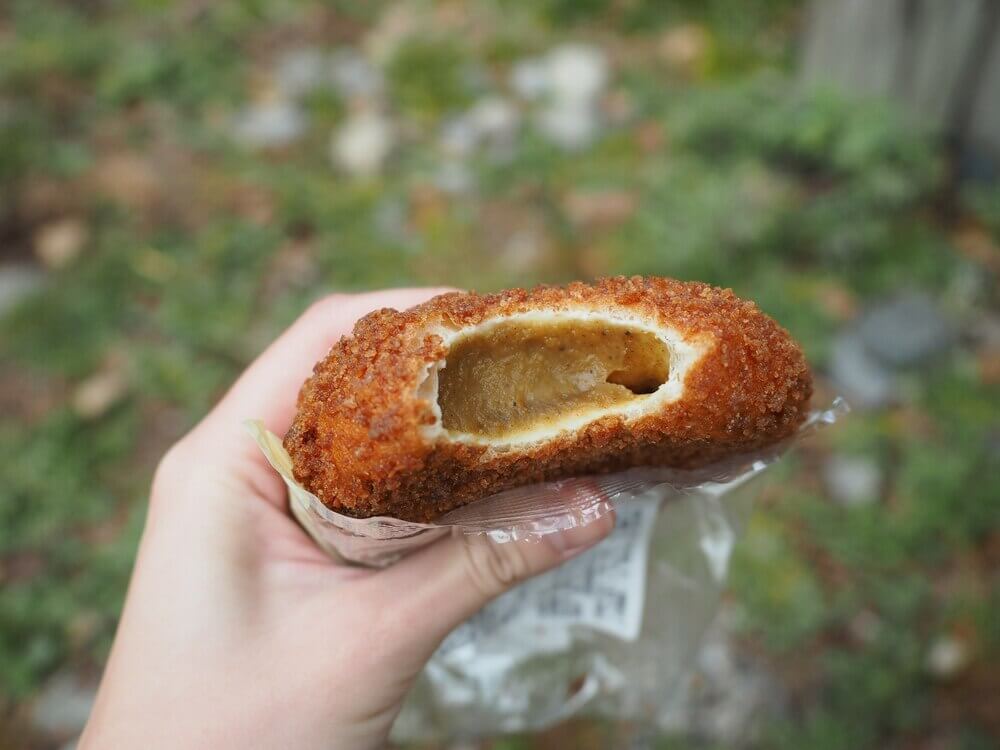
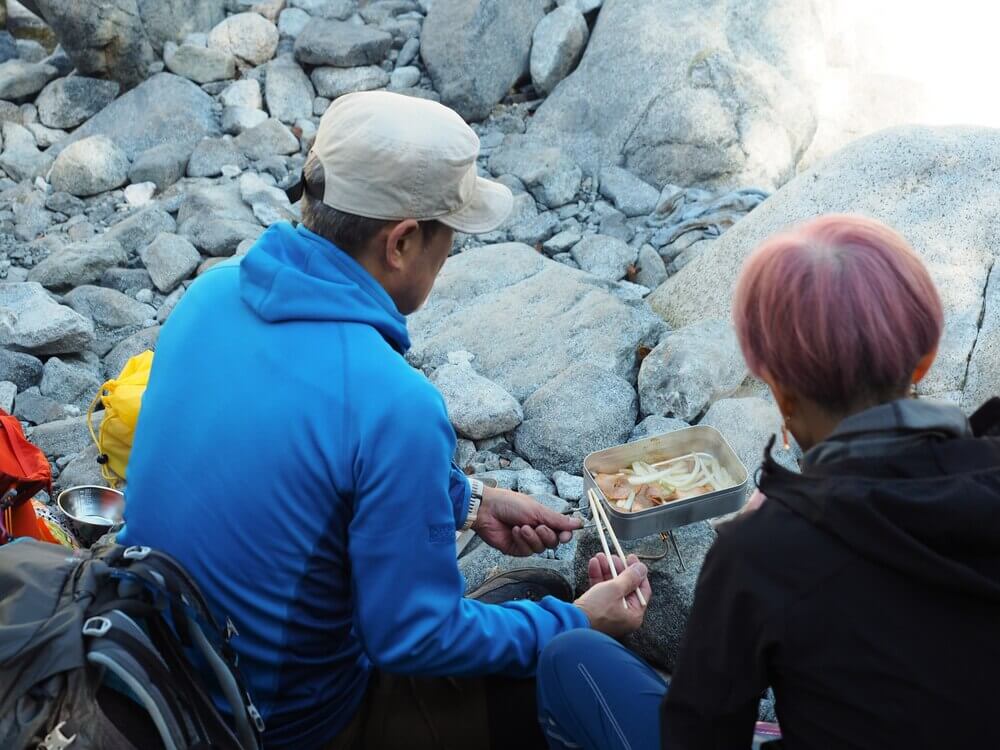
After approximately 1 hour-walk, you’ll arrive at Hondani Bridge, another fabulous spot on this hike. Listening to the sound of the flowing river while eating and watching the clouds moving slowly from side to side. No wonder why just a simple curry bun bought from 7-11 tastes this good! (Though actually I was secretly craving for those sizzling onions and meat on the frying pan from a couple beside me…)

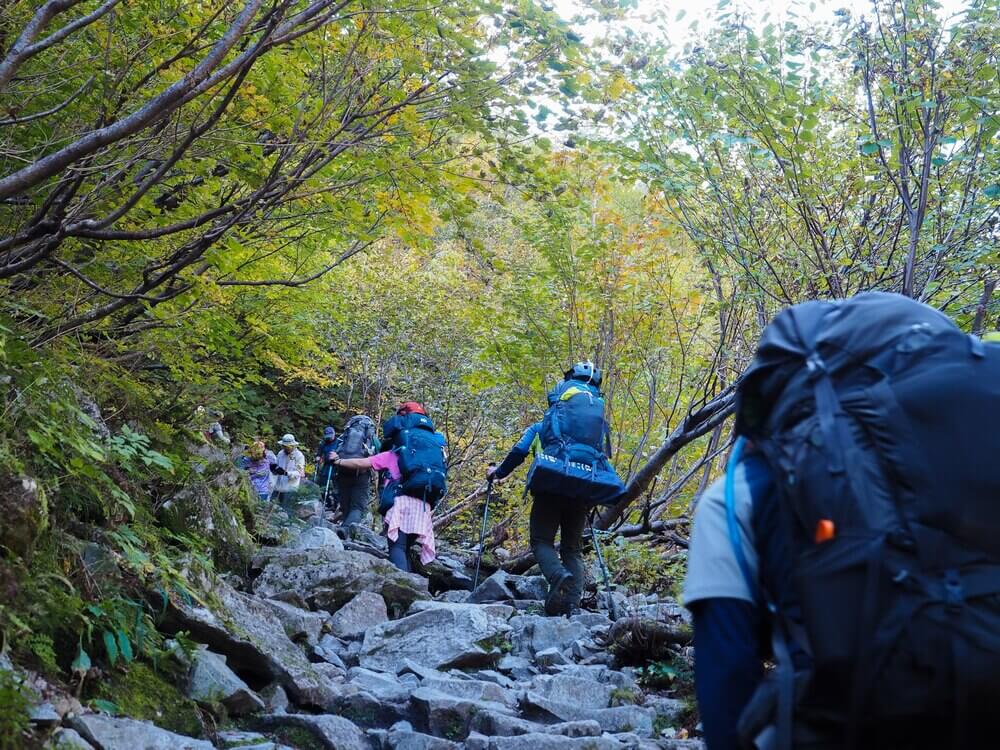
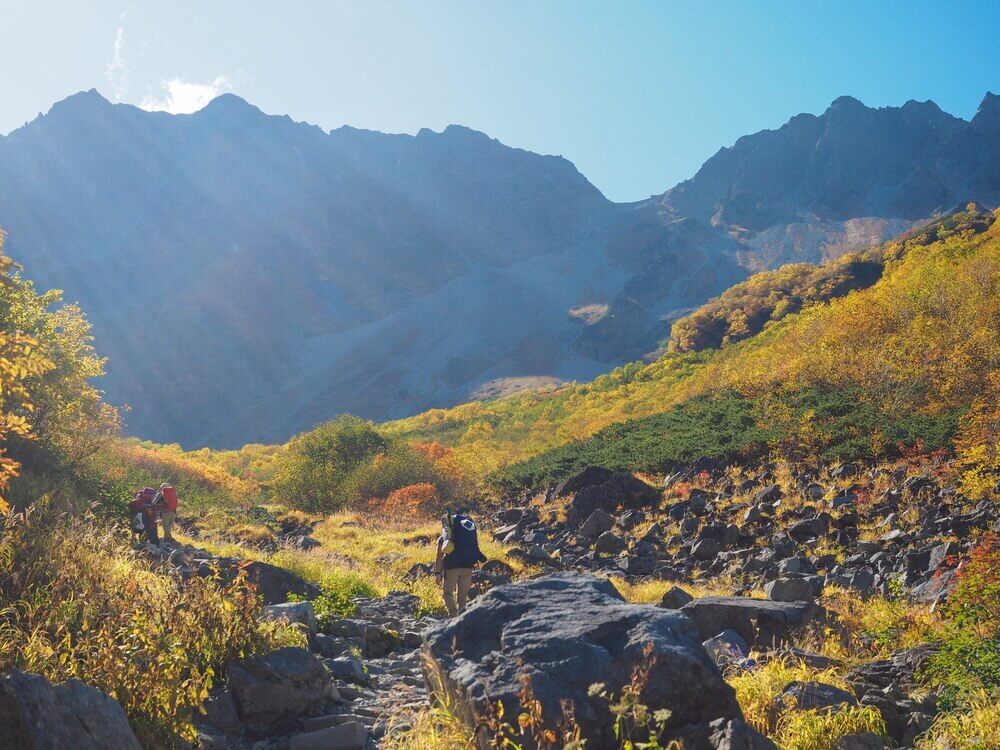
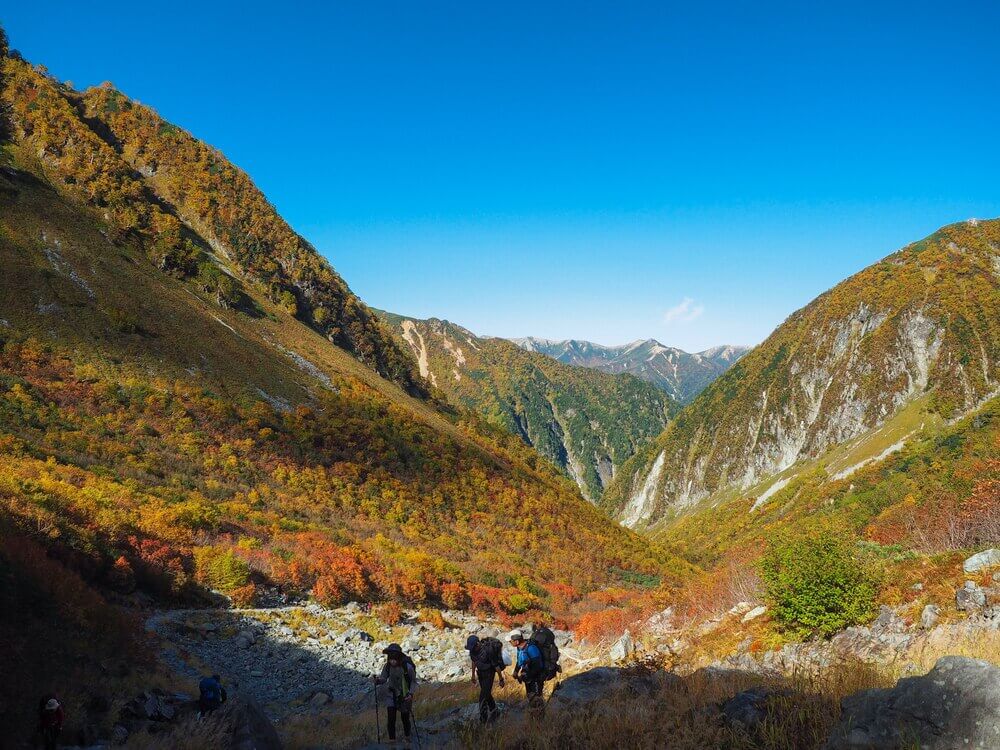
From this point, the trail gets a lot steeper. On the way climbing up, we saw a lady hobbling down with one leg tied to a makeshift splint made from a hiking pole. She was crying without a sound. (You know how bad it is when you cry silently.) Shortly after that, we saw a rescue team passing, assumed that they were rushing to help that poor lady. So, everyone, please be very careful!
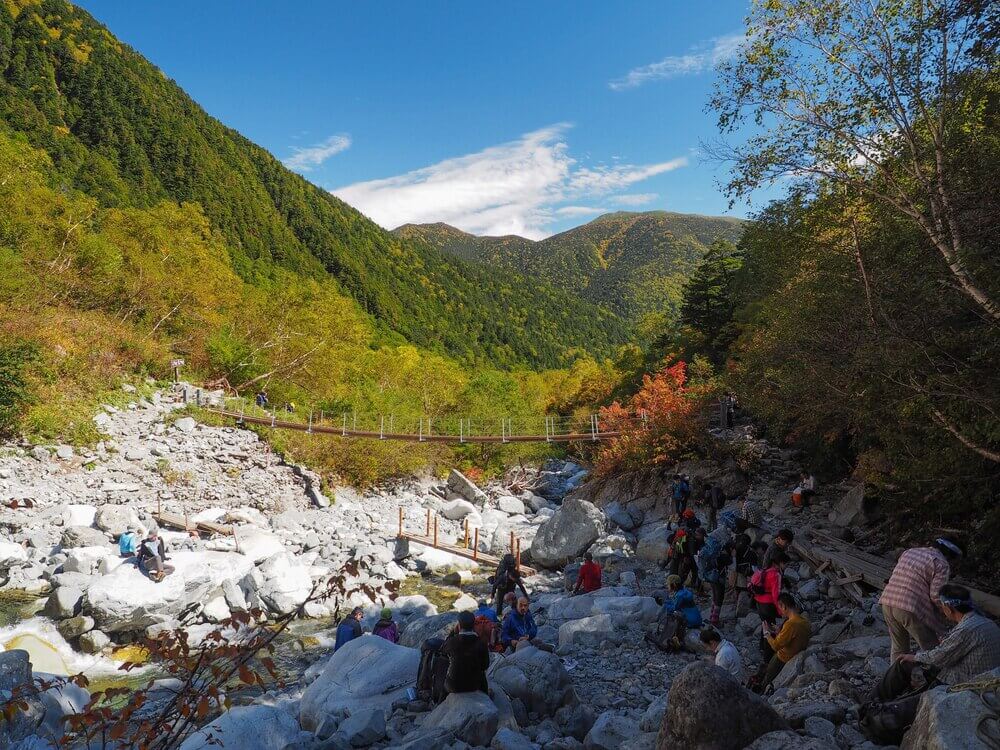
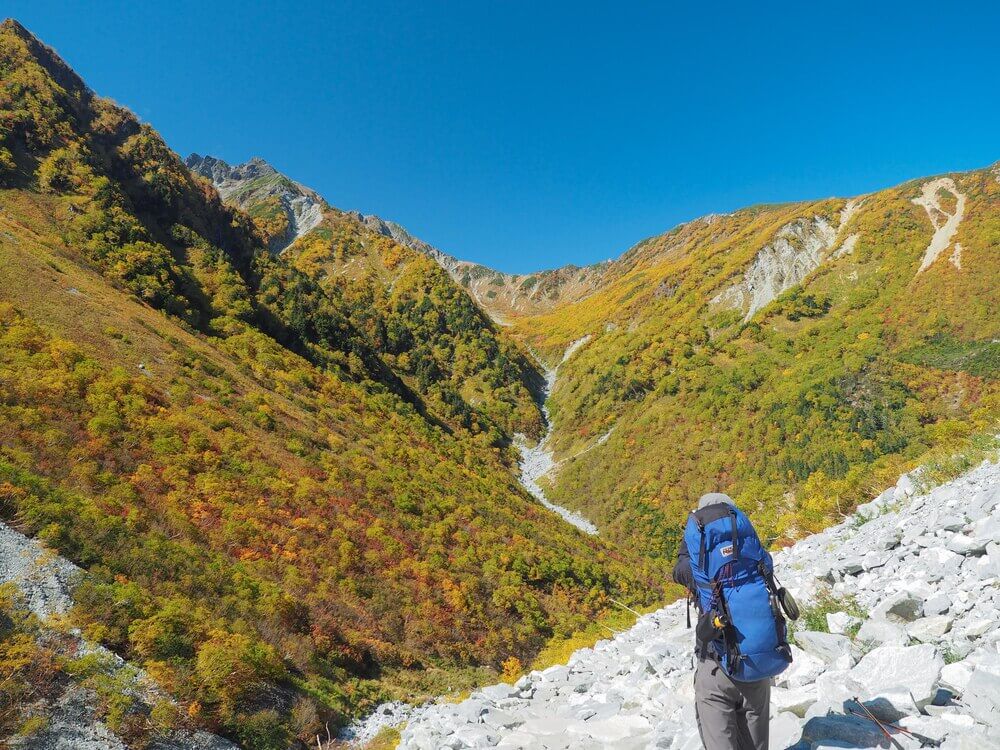
Another major landmark is this short section of rocky path, where one side is a huge slope of rocks, while the other side is a jaw-dropping beautiful ravine. However, it is a dangerous spot with high risk of falling rocks, so don’t stop here for too long.
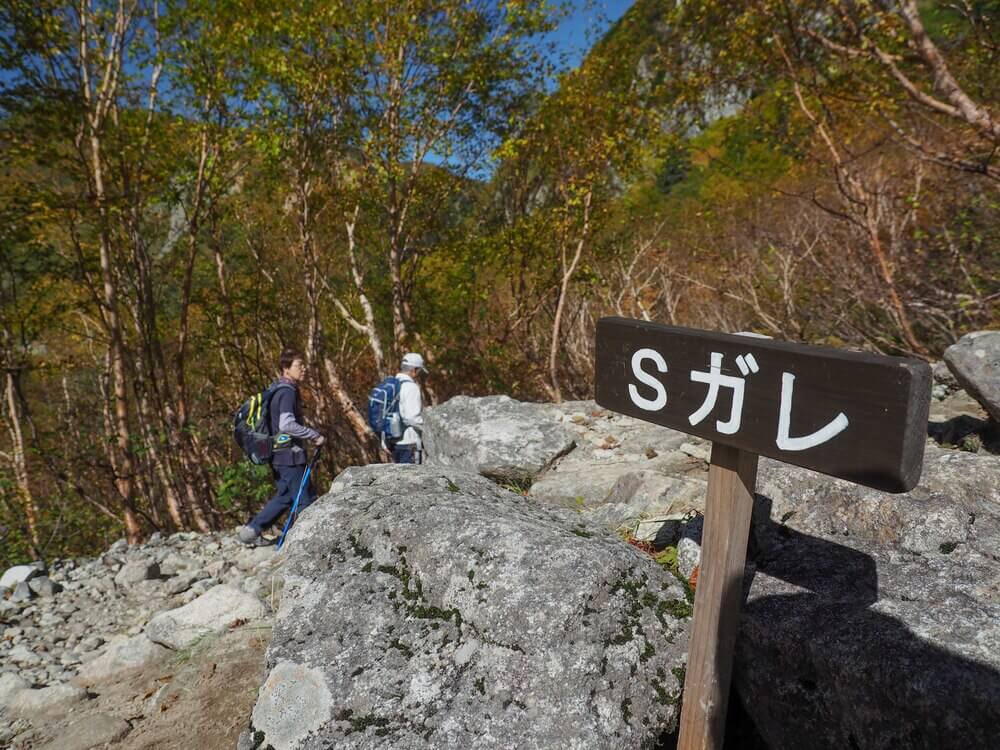
S Gare (S Scree)
This little sign tells you that you have now arrived the point called “S Gare”. “Gare” in Japanese means “a scree slope”. Nothing special, it’s just a sign telling you that there is only about 1 hour left to Karasawa Cirque.
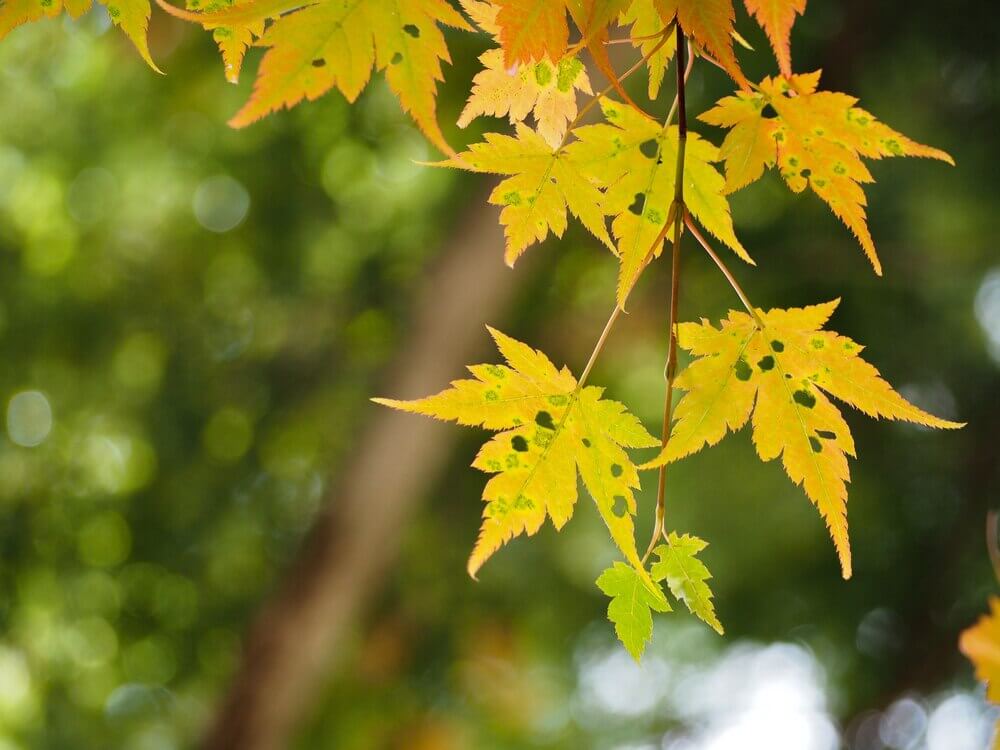
The passing scenery was mind blowing, but the nearer you get to the Karasawa Cirque, the scenery gets even better as you can see more vivid autumn leaves.
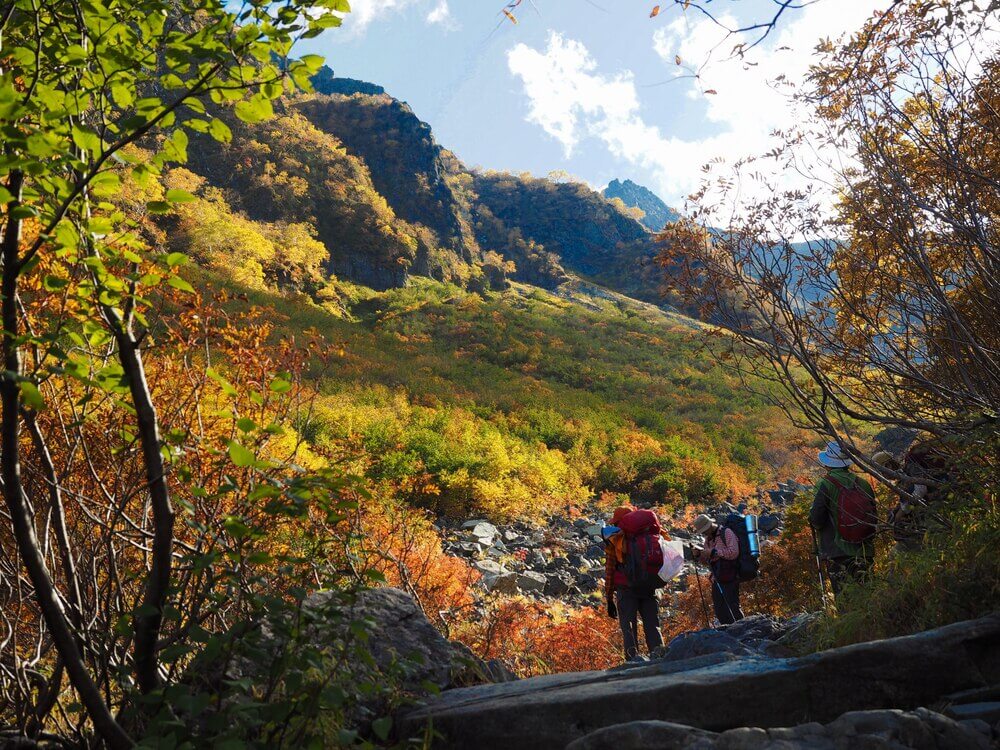
Karasawa Cirque
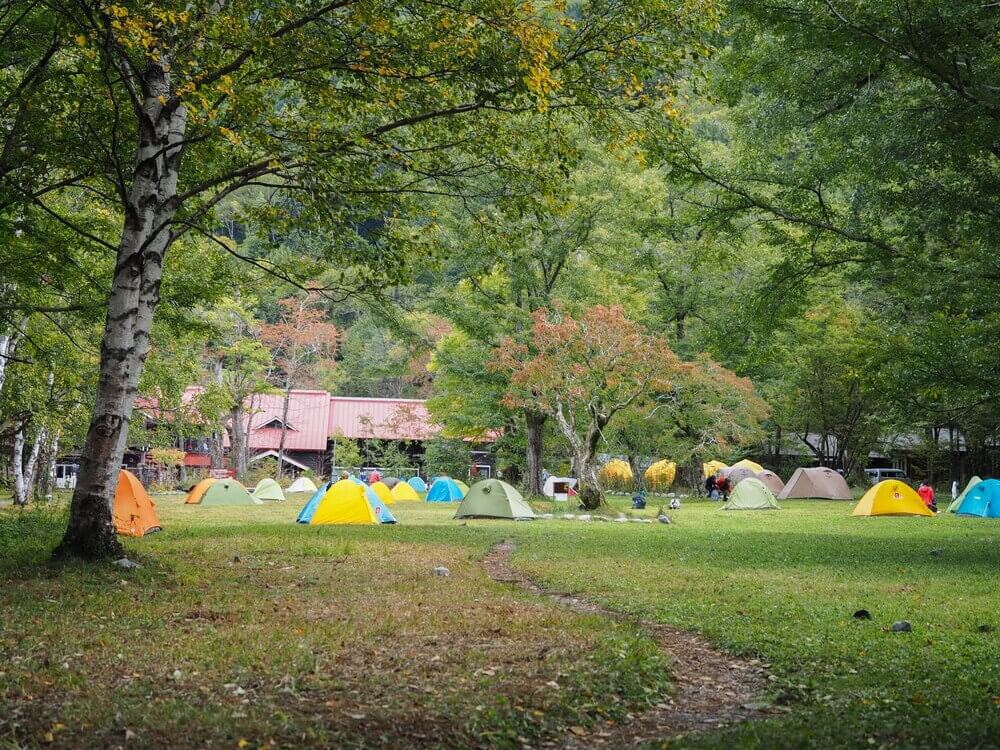
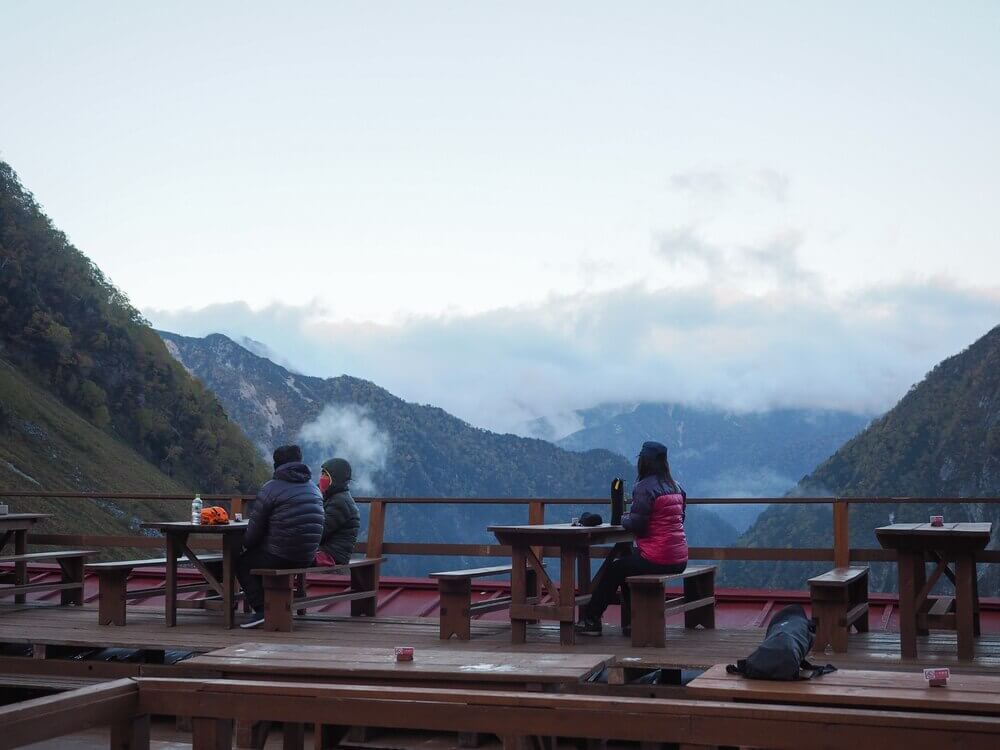
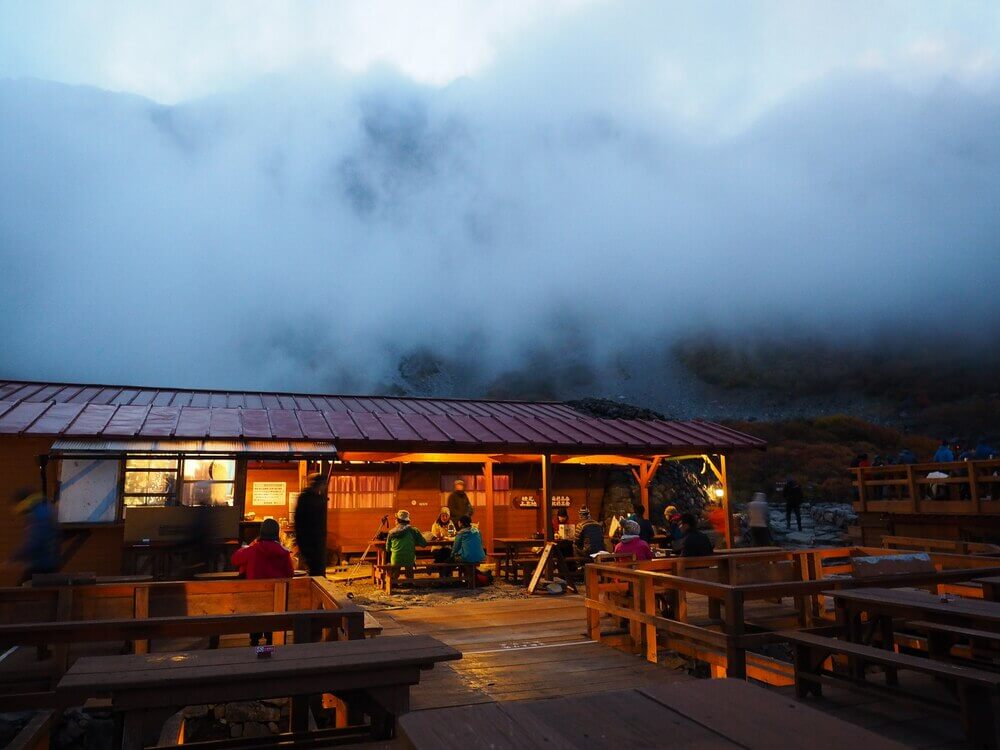
Finally, after about 6 hours of hiking, we have now reached the Karasawa Cirque! The sceneries before our eyes are just a big wow factor! The Hotaka mountain range looks so close to us (although you need another 4 hours hike to reach Mt. Oku-Hotaka, the highest peak of Hotaka Mountain). And look at those colorful tents below! Did someone just drop a pack of m & m’s on the ground?

Nothing is better than eating while appreciating the beauty of natural wonders, so we ordered a ramen (1,000 yen) and a Coca-Cola (400 yen). Their popular menu “Oden” (Fish cake stew) was already sold out, so we missed out! As the best spots on the terrace were already taken, we had no choice but to sit anywhere unoccupied.

Too bad that almost shortly after we had arrived, the sky suddenly got cloudy. We should have taken more photos when the sky was still clear.

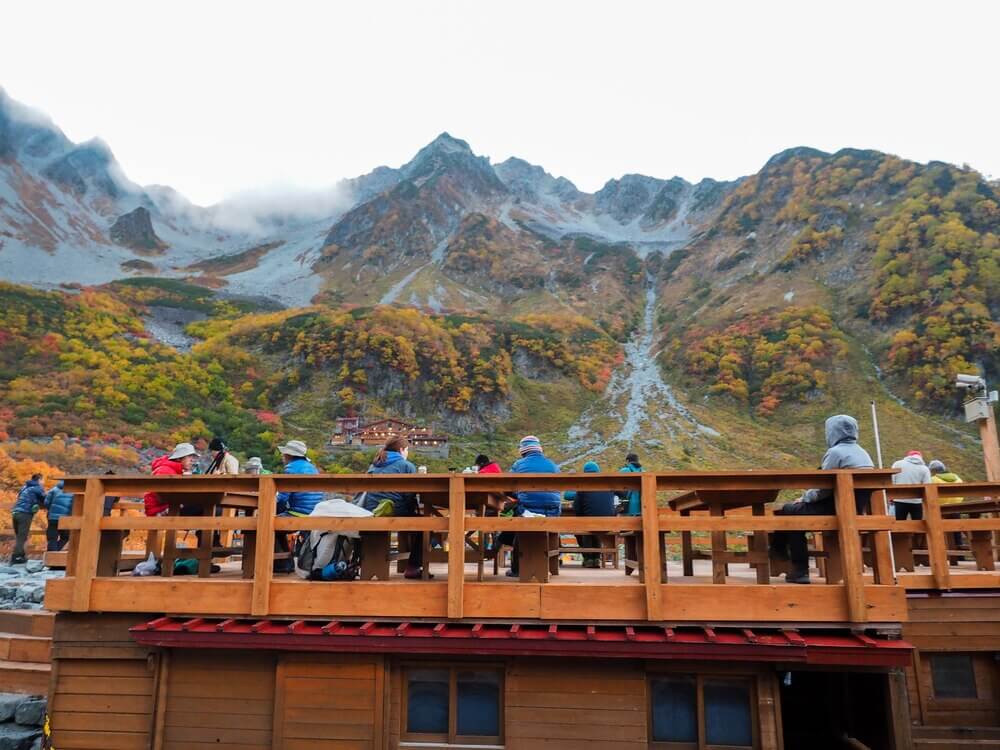
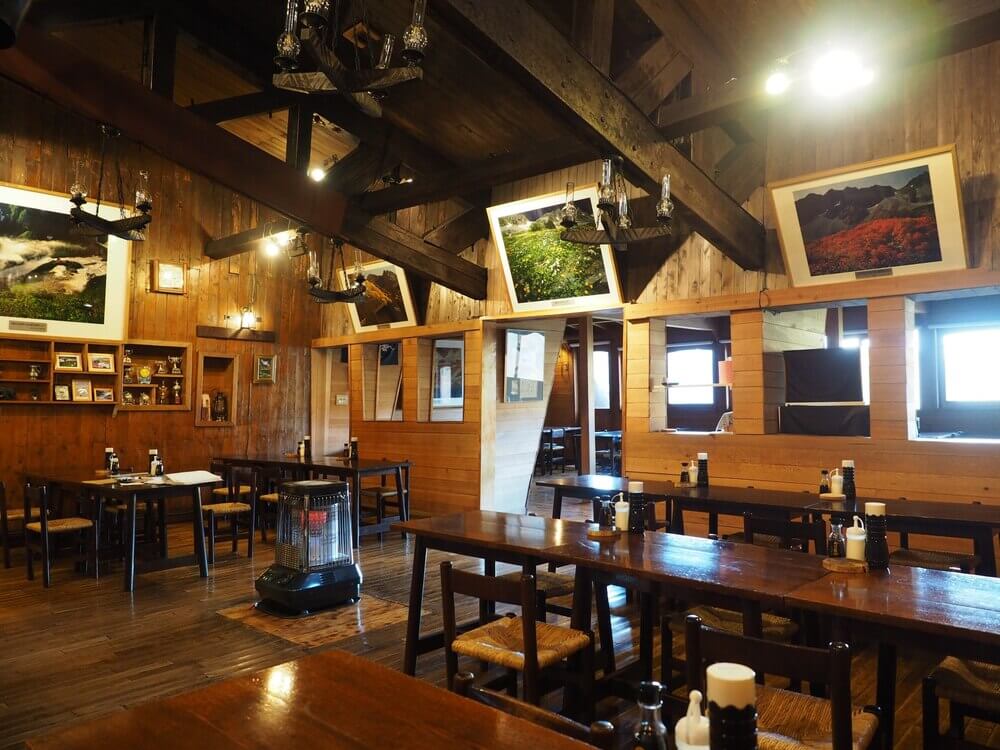
The place we stayed for the night is “Karasawa Hutte”, which is only a few steps below the terrace. It is a very well organized and comfortable mountain hut. It consists of 3 separate buildings.

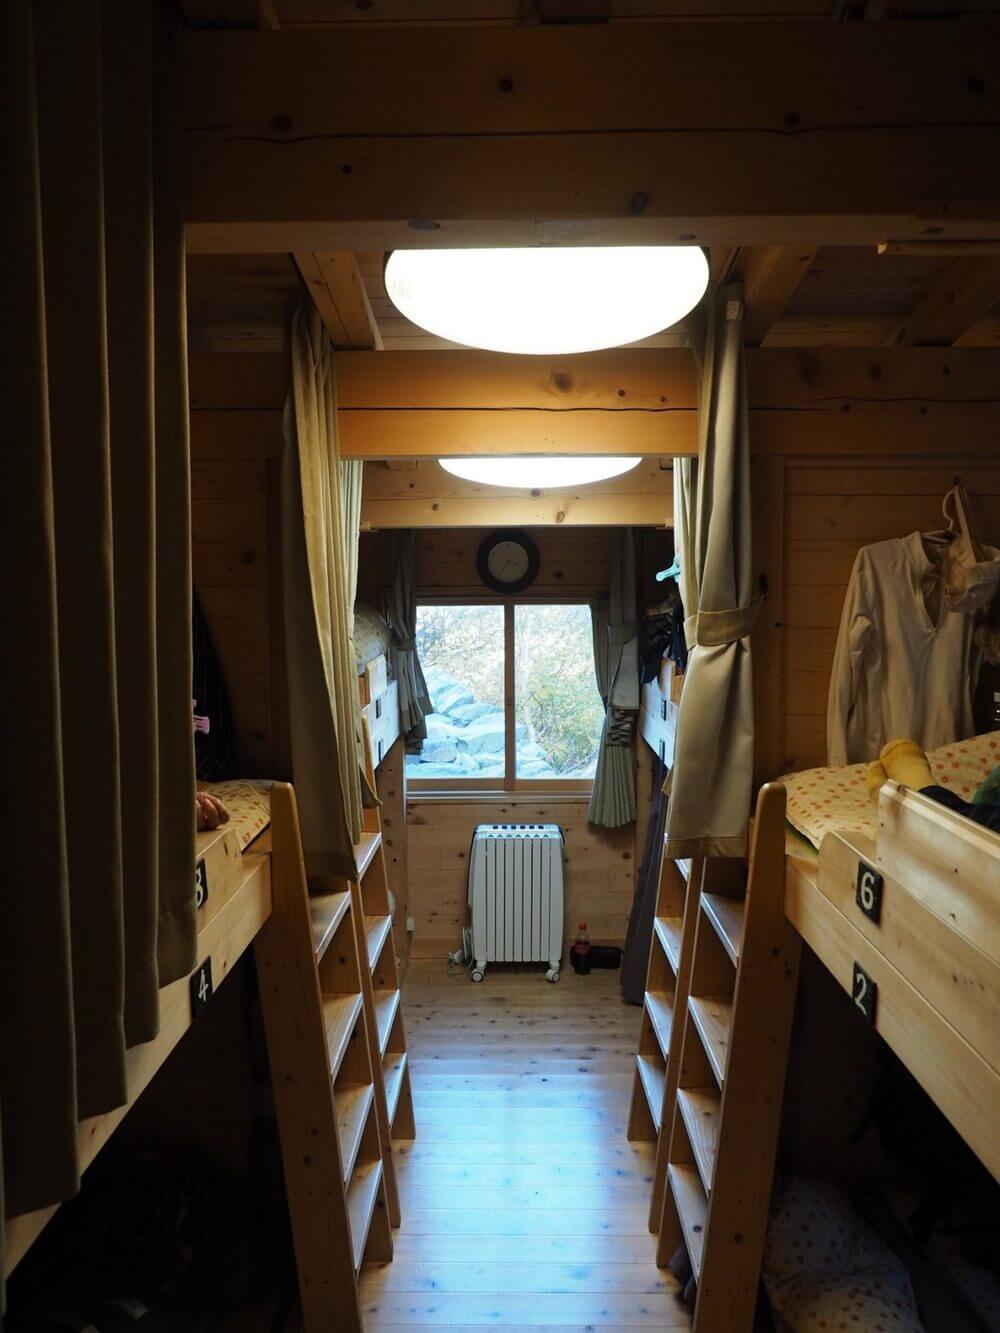
We were assigned a room with bunk beds to sleep with other 6 people. The room was clean but if you need a higher level of cleanliness, you can buy a disposable inner sheet to put inside your bedding. I am not sure but from what I see there are rooms where you sleep side by side with other people like any other mountain huts. By the way, the lights-out time is 9:00 PM.
Breakfast and dinner times are divided into 3 rounds, 30 minutes each. You will be informed your round when checking in.
Note: Paid toilets (100 yen) are available for non-staying guests (free for staying guests). You should expect a long queue in the morning.
Highlights of the Trip
After dinner time, we went out for the highlight of the night. The entire tenting area was lit up beautifully, creating a magical scenery.
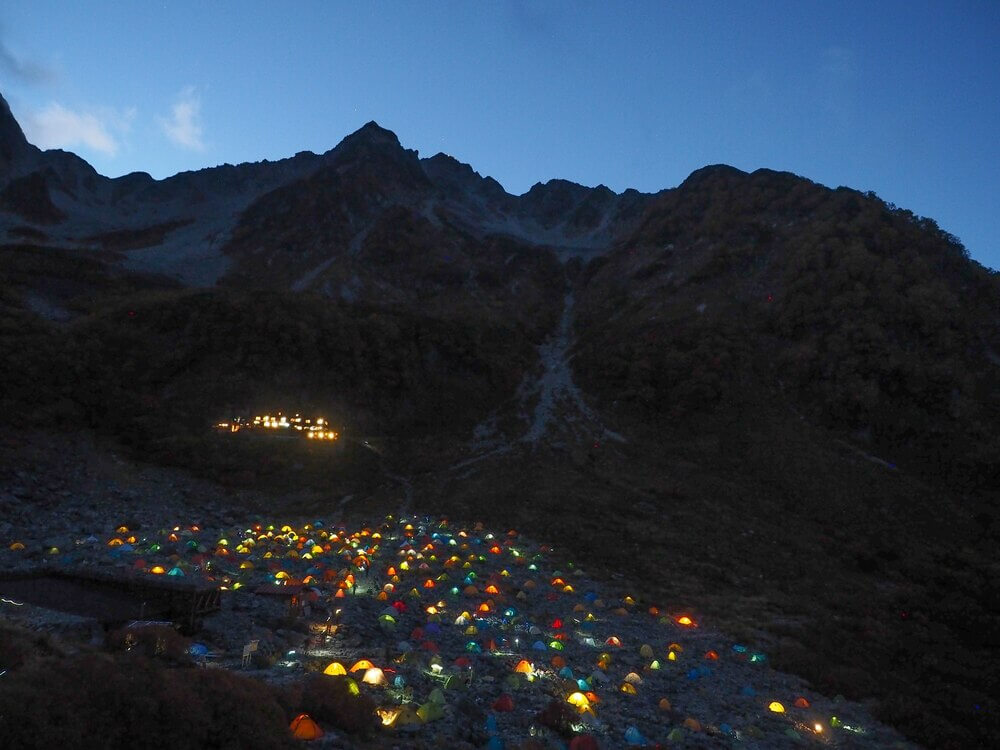
The lights shining through from inside these colorful tents with the Hotaka Mountains behind is one of the main events that everyone waits to see. It is said that the record for the highest number of tents is as many as 1,400 in just one night! The building standing individually beyond the tents area is another mountain hut, “Karasawa Koya”.
The next morning was quite busy as we woke up early at 5AM, quickly finished our breakfast and hurried to secure a spot to witness “morgenrot”, a fantastic phenomenon when the rising sun casts its reddish rays across the mountain peaks. This term comes from German words, “morgen” (morning) and “rot” (red). The memorable moment lasts only about 5-10 minutes and will not happen unless the conditions are met. So, yes. We were lucky enough!
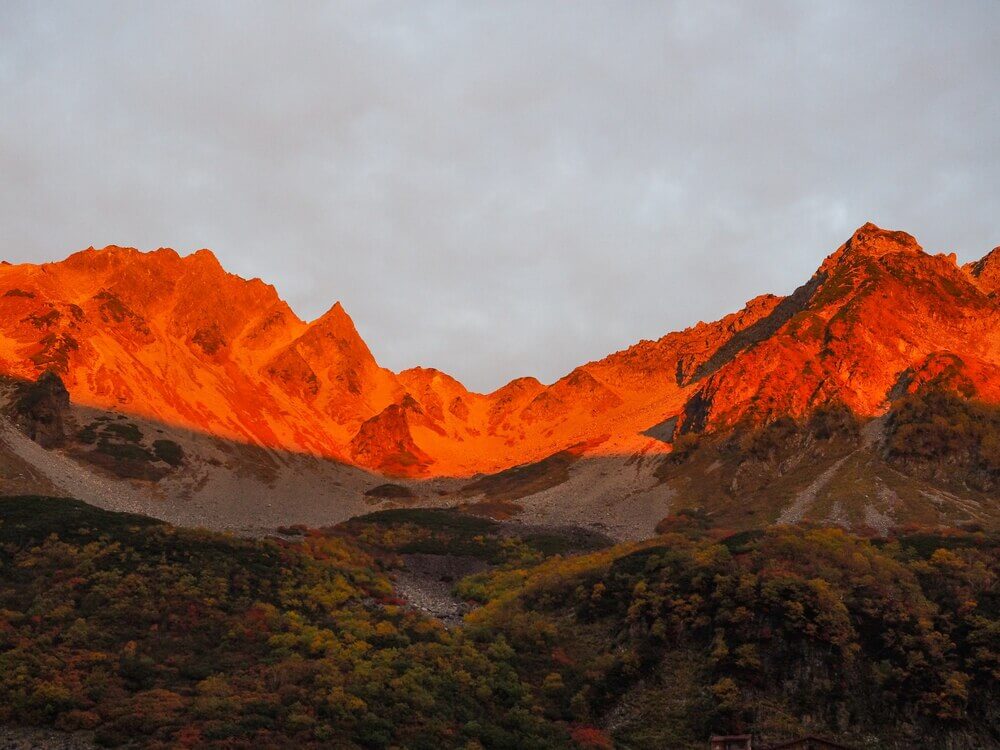
Nagano prefecture is surrounded by mountains, including the Japanese Alps. There are several places that you can see morgenrot, even from the downtown. Maybe we can write about that for the next blog entry!
Getting to Kamikochi
Another reason why Kamikochi is such a popular hiking destination is that it is very easy to get to, with various bus routes from all major cities.

From Matsumoto to Kamikochi
It takes 30 minutes by train from JR Matsumoto station to Shin-Shimashima station. After getting off at Shin-Shimashima terminal station, you need to change to the bus bound for Kamikochi and continue the journey for another 1 hour to reach Kamikochi. Services are frequent with trains and buses departing every hour.
See timetable for Matsumoto – Kamikochi Line >
Starting from 2021, We added two direct buses from Matsumoto Bus Terminal to Kamikochi. This bus is called the “National Park Liner”. (Reservation required)
Book a direct bus from Matsumoto to Kamikochi >
Read also: How to get to Kamikochi from Matsumoto by bus (in details)
From Tokyo to Kamikochi
Buses from Tokyo station and Shinjuku Expressway Bus Terminal depart late at night (night bus) and early in the morning (day bus). When booking, please choose your seat type. The 3-row-seat type bus (green car) provides you with a more comfortable seat and complimentary amenities for a small extra fee. (Please note that the night bus has a longer travel time, so that it arrives in Kamikochi after sunrise)
See timetable for Tokyo – Kamikochi Line >
See timetable for Shinjuku – Kamikochi Line >
The buses departing from Shibuya and Kawagoe only have a day bus service with standard 4-row seat type available.
See timetable for Shibuya – Kamikochi Line >
See timetable for Kawagoe/Omiya – Kamikochi Line >
Another way to travel to Kamikochi from Tokyo is to use the JR limited express train Azusa (2.5-3hrs / 6,900 yen) or Alpico highway bus (3.15hrs / 4,100~4,500 yen) to get to Matsumoto first, then change to a local train and bus.
From Osaka to Kamikochi
There are 2 roundtrips daily. The night bus departs late at night, using a 3-row-seat type bus (green car) for more comfort for a longer journey, while the day bus departs early in the morning with a standard 4-row-seat type bus. (Please note that the night bus has a longer travel time, so that it arrives in Kamikochi after sunrise)
From Nagano to Kamikochi
This service operates on specific dates with only 1 roundtrip daily. The one-way journey takes around 3 hours. The standard 4-row-seat type bus will be used for this route.
From Takayama to Kamikochi
From Takayama, take a 1-hour bus ride to Hirayu Onsen, then transfer to a bus bound for Kamikochi for another 30 minutes.